A step-by-step guide to rebuilding your damper-rod fork.
You’re diligent about changing your engine oil, but what about your fork oil? The oil inside your fork gets dirty and degrades over time, compromising damping and increasing wear. Fork oil should be changed every year or every 10,000 miles, and when it comes down to it, it’s not that difficult of a job.
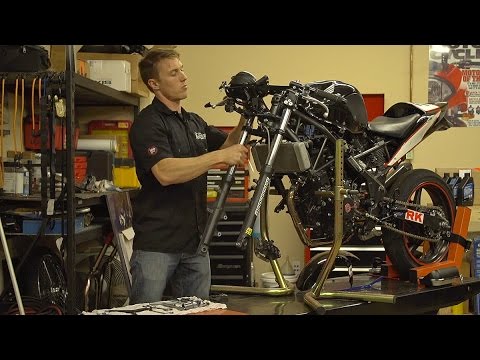
In this MC Garage video, Road Test Editor Ari Henning demonstrates how to not only change your fork oil, but also how to fully disassemble, inspect, and rebuild your right-side-up damper-rod fork. Tackling the task yourself will save you money, help you understand your bike better, and give you the satisfaction that comes from working on your own motorcycle.
Subscribe:
Motorcyclist Shirts:
Shop Products We Use:
See more from us: .
Images related to the topic m c technology
Motorcycle Suspension Tech and Maintenance: How To Rebuild Your Fork | MC GARAGE
Search related to the topic Motorcycle Suspension Tech and Maintenance: How To Rebuild Your Fork | MC GARAGE
#Motorcycle #Suspension #Tech #Maintenance #Rebuild #Fork #GARAGE
Motorcycle Suspension Tech and Maintenance: How To Rebuild Your Fork | MC GARAGE
m c technology
See all the latest ways to make money online: See more here
See all the latest ways to make money online: See more here
great boss, also stop by the M69 channel
Very good detailed video.
Thank u very much
Hi.we to lock for parts BMW r850r motorcycle
Seriously great vid , going to tackle it will confidence.
Good job
So now I know I need a bike mechanic
great video! what stand are you using to lyft the bike? thanks!
Great. except there's something wrong here. he put the fork caps back on with no effort. sorry. but that is not reality. they can take a lot of effort and the entire dallas Cowboys defense to push them down and get it threaded. why publish something so full of shit.
This has to be one of the best "how to" videos I've ever seen. Straight, clear and to the point.
2:59 wooOooh
2021?
first fork oil and then the spring????is for all motorcycle??this measure in manual is with oil and spring installet???or before spring???
dont use screwdriver to loosen fork seal and ring. use a hard plastic piece instead
It seriously feels like watching a cooking show episode
May I suggest after installing the damper rod also slide in the spring. Then stand it up on the spring so that damper rod is fully extended through the inner fork leg. Then you can put on the bottom out cone and slide on the outer fork leg. That way all of it stays lined up when you install the bottom fork screw.
I also like to use ether vacuum or pressure to remove all the air in the oil. Air causes cavitation and rises the temperature in the oil.
Simply ether push the inner fork leg in, place your hand on it and pull the fork leg up to apply vacuum. Or if you like to apply pressure rise the inner fork leg, place your hand on it and push the fork leg down. Both cases do not let air to scape until you are done.
What about USD forks
Absolutely professional and clear explanation for that sensensitive fork.. 5 years old video and I didn't find any other video that clear and useful. You make it possible.. Thanks a lot.
very useful guide!, i am rebuilding my fork as well in HK, it really helps a lot, may i ask a question, i've disassembled my front fork, and noticed some scratch on my damper rod, the bush on it seems to be a bit loose and makes the damper rod hard to be taken out. should i replace the damper rod and/or the bush?
how do i tell if i should replace them?
Anyone else gag when the oil came out?
What bike is this?
5 years on and it is still the best video on servicing fork seals on YouTube.
I couldn’t get the damper rod screw to come off, i read that an impact gun would help n it did
If your damper rod bolt and stanchion is rotating, put the fork back on your bike so it'll hold the stanchion so you can loosen the fork cap (0:30–0:35). Don't forget to use a rag when removing the fork cap. Good luck.
Awesome video.
Completely rebuilt mine today following this and it was perfect!!
You didnt show the difference between when it was bad and good.
I'm just doing mine, I'm confident after watching your superb tutorial that I can do it. Thank you.
I teach motorcycle repair at a technical high school. My students better not spray any aerosol cleaners into the same pan where we drained the oil into, because it contaminates the oil to the point where it cannot be hauled off for recycling. Just a note for folks that must recycle oils. Bill Ross – Region 10 Technical High School – Brunswick, Maine
Are this components and method exact for a 2006 CBR1000RR? Thanks!
I think they're called bushings, not bush – but I'm OK with your version. Gave me good laugh. lol
The FZ-07 you have to keep the fork upright to keep the parts in the bottom in place..
That Damper Rod bolt has a copper washer on my Yamaha FZ-07. I am trying to figure out what parts I need to keep and what parts I need to remove when I install the Ohlin cartridge kit.. I het a deer and bent my forks in Michigan.. New Yamaha FZ-07 forks $208.00 each Ohlin Cartrige kit and springs $900.00 I sure hope they are worth it ..
Best way to rebuild forks….new forks XD
Fuck that lol defenitly paying someone to do it .
Really good videos. Thanks a lot.
“You should be able to spread the Bush with your fingers and slide it onto the stanchion.”
Bless your heart
Where did you get the kits?